
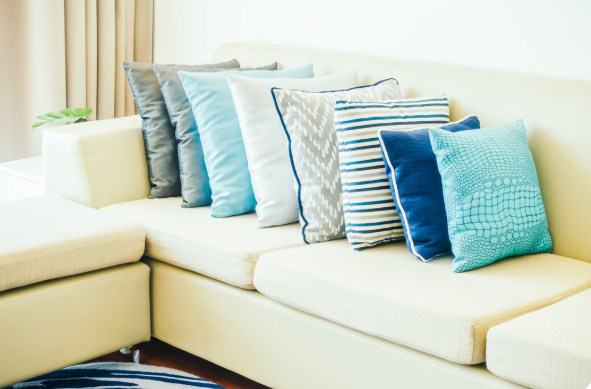
Blue and white pillows are a timeless decorating choice that can instantly make a room feel fresh, comfortable, and thoughtfully designed. The combination works across many interior styles, from coastal and farmhouse to modern, traditional, and minimalist spaces. Because blue comes in so many shades and white provides a clean neutral background, these pillows can be used to add color without overwhelming an existing décor scheme. Whether you are updating a sofa, refreshing a bedroom, styling an outdoor seating area, or simply looking for an affordable way to change the appearance of a room, blue and white pillows offer plenty of possibilities. With the right combination of colors, patterns, textures, and sizes, they can become an attractive finishing detail. Why Blue and White Pillows Work So Well Blue and white are naturally versatile colors. White creates a bright and clean appearance, while blue introduces depth and personality. Together, they can create anything from a relaxed beach-inspired atmosphere to an elegant traditional look. Another advantage is that blue works well with many existing colors. Blue and white pillows can complement gray sofas, beige furniture, wooden pieces, cream bedding, black accents, and even colorful rooms. The combination is also easy to update. Instead of replacing an entire sofa or bedding set, adding a few decorative pillows can change the overall appearance of a space at a relatively low cost. Choosing the Right Shade of Blue The shade of blue makes a major difference in the mood of your room. Light blue pillows can create a soft and relaxing atmosphere. They work especially well in bedrooms, nurseries, reading corners, and coastal-inspired spaces. Navy blue pillows offer a more sophisticated appearance. Navy and white can look particularly attractive on neutral sofas or beds and can add contrast without appearing too bright. Royal or cobalt blue creates a stronger visual statement. These shades are useful when you want your pillows to become a noticeable decorative feature. Dusty blue and muted blue-gray tones are suitable for modern and understated interiors. They provide color while maintaining a calm, sophisticated appearance. When selecting blue pillows, consider the other colors already present in the room. Matching the exact shade is not always necessary. In fact, combining different blue tones can create a more layered and interesting design. Popular Patterns for Blue and White Pillows Patterned pillows can add personality and visual interest. There are many patterns that work beautifully with a blue and white color scheme. Stripes Blue and white striped pillows are among the most versatile choices. Horizontal stripes can create a relaxed look, while narrow vertical stripes may feel more refined. Stripes are particularly popular in coastal, nautical, farmhouse, and traditional interiors. Floral Patterns Blue and white floral pillows can create a softer and more decorative appearance. They are suitable for bedrooms, living rooms, and traditional interiors. For a subtle look, choose small floral prints. Larger floral designs create a stronger focal point. Geometric Patterns Geometric blue and white pillows can give a room a contemporary feel. Squares, diamonds, triangles, and abstract shapes work particularly well in modern spaces. If your furniture is simple and neutral, geometric pillows can add structure and visual movement. Plaid and Checkered Designs Blue and white plaid or checkered pillows are excellent for farmhouse, cottage, and casual decorating styles. They pair especially well with natural wood furniture and neutral upholstery. Abstract Prints Abstract patterns allow you to introduce blue and white without following a specific decorating theme. They can work well in modern apartments, offices, and contemporary living rooms. Mixing Different Blue and White Pillows Using several pillows does not mean every pillow needs to look identical. Mixing patterns and textures can create a more professional and comfortable appearance. For example, a sofa might feature one solid navy pillow, one blue and white striped pillow, one patterned pillow, and one textured white pillow. The key is to maintain a consistent color palette. Even when the patterns differ, keeping blue and white as the main colors helps the arrangement feel coordinated. You can also vary the scale of the patterns. Pairing a large print with a smaller print and a simple solid pillow prevents the arrangement from looking too busy. Blue and White Pillows for the Living Room The living room is one of the easiest places to use blue and white pillows. A neutral sofa provides an excellent background for this color combination. On a white, cream, beige, or gray sofa, navy and white pillows can create a classic appearance. For a darker sofa, lighter blue and white pillows can provide contrast. Try arranging pillows in different sizes. Larger square pillows can form the foundation, while smaller decorative pillows can be placed toward the front. For a casual room, use a combination of stripes, simple patterns, and soft textures. For a more formal living room, choose structured designs and elegant fabrics. Blue and White Pillows for the Bedroom Blue and white pillows are also ideal for bedrooms because the colors can create a peaceful atmosphere. A white or cream bedding set can be transformed with several blue accent pillows. Navy blue can provide contrast, while light blue creates a softer appearance. Consider layering pillows from largest to smallest. European-style square pillows can be placed behind standard pillows, followed by decorative blue and white pillows in front. For a coordinated appearance, repeat the blue shade somewhere else in the room. This could be through curtains, a rug, artwork, a throw blanket, or a small decorative accessory. Using Blue and White Pillows in Coastal Décor Blue and white are classic coastal colors. If you want a relaxed beach-inspired room, consider combining different shades of blue with white fabrics and natural materials. Striped pillows, subtle wave patterns, textured fabrics, and simple nautical-inspired designs can all work well. However, coastal décor does not require anchors, seashells, or obvious nautical symbols. A simple combination of pale blue, navy, white, linen, and natural wood can create a sophisticated coastal appearance without feeling themed. Blue and White Pillows

The Joys of Lake Living: How to Make the Most of Your Lakefront Lifestyle
Nestled along the serene shores of a glistening lake, a lake home offers a tranquil escape from the hustle and bustle of everyday life. Whether you’re the proud owner of a cozy cabin or a sprawling waterfront estate, the joys of lake living are truly unparalleled. In this comprehensive guide, we’ll explore the many ways you can make the most of your lakefront lifestyle and create lasting memories with loved ones. Embracing the Outdoor Lifestyle of Lake Homes One of the primary allures of lake homes is the abundance of outdoor recreational opportunities at your fingertips. From kayaking and canoeing to fishing and swimming, the lake becomes your personal playground. Invest in high-quality water sports equipment to make the most of your time on the water, and consider hosting fun-filled family barbecues or picnics on the dock as the sun sets over the glimmering surface. Equally important is taking the time to simply relax and soak in the natural beauty that surrounds your lake home. Lounge on the patio with a good book, or spend quiet moments watching the wildlife that calls the lake home. The soothing sounds of lapping waves and the fresh, crisp air will leave you feeling rejuvenated and at peace. Creating a Cozy Indoor Retreat While the outdoors may be the main draw of lake living, it’s equally important to cultivate a cozy and inviting indoor space that complements your lakefront lifestyle. When designing the interiors of your lake home, incorporate natural materials and earthy tones to create a seamless transition between the indoor and outdoor environments. Invest in comfortable, weather-resistant furniture that can withstand the elements, and consider adding features like a stone fireplace or a wet bar to enhance the overall ambiance. Incorporate large windows and sliding glass doors to maximize the stunning views and allow natural light to flood the space. Entertaining and Hosting One of the greatest joys of owning a lake home is the opportunity to host family and friends in a truly remarkable setting. Whether you’re planning an intimate gathering or a lively lakeside party, your home’s unique location and amenities will make for an unforgettable experience. Equip your outdoor living spaces with ample seating, a grill, and perhaps even a fire pit or hot tub for added luxury. Consider adding a boat dock or a private beach area to provide your guests with easy access to the water. And don’t forget to stock up on water sports equipment, board games, and other entertainment options to keep your visitors engaged and entertained. Integrating the Local Community When you own a lake home, you become part of a vibrant, close-knit community of fellow lake enthusiasts. Take the time to explore the local area and immerse yourself in the unique culture and traditions that thrive around the lake. Attend community events, such as fishing derbies, music festivals, or boat parades, to connect with your neighbors and fully embrace the lake lifestyle. Consider joining a local lake association or volunteer organization to contribute to the preservation and enjoyment of the waterfront environment. By embracing the joys of lake living and taking the time to fully immerse yourself in the lakefront lifestyle, you’ll create memories and experiences that will last a lifetime. So, dive in, get your feet wet, and enjoy the many pleasures that come with calling a lake home your own.

Important Things to Know When Constructing A House from Scratch
If you are considering constructing a house from scratch, you should understand the importance of getting the foundation right. However, there are many things that go into constructing a house from scratch. With that said, let us deep-dive into the list of efficient steps that you need to know about when constructing a house from scratch. Read on to learn more. You Must Analyze Your Budget It does not matter whether you want to buy a new house or construct your dream house from scratch; your budget will define what you can buy or construct. With that said, it is incredibly important to analyze your budget and truthfully analyze your financial situation so you can determine what you can actually afford. You might want to work closely with a financial advisor to establish your budget and a detailed cost breakdown. Getting in touch with a homebuilder is also advised, especially for determining the costs for labor, materials, and permits. Nonetheless, by setting your budget, you can understand your financial limits and determine your loan needs. You Need Excavation Services For brand-new house construction, you should know that you will need excavation services to create a stable and solid foundation for your house. With excavation, you can prevent foundation damage in the future, along with structural damage. With excavation, you can have the rocks, debris, and soil removed, which is mandatory for building a solid and flat foundation for your house. Nonetheless, with excavation services, you can correct the depth of your foundation and establish the much-needed support for your entire house. You Must Be Mindful When Choosing the Location Another important thing to know when constructing a house from scratch is choosing the site for your construction mindfully. With that said, you might want to have the soil in your desired location checked to ensure that it is suitable for home construction. Double-check for local regulatory standards, especially regarding zoning regulations, amenities, and accessibility. At this stage, it is also in your best interest to hire a team of professional experts, such as contractors, homebuilders, architects, and engineers, for the effective construction of your house. Familiarize Yourself with Building Codes Another important thing to know when constructing a house from scratch is getting familiar with potential building codes. By understanding the building codes of your selected location for home construction, you can essentially ensure the health and safety of you and your loved ones while living in the newly constructed house. Moreover, getting familiar with building codes can help avoid legal issues in the future as you get to construct your house according to the regulatory standards. You Must Incorporate High-Quality Materials You should know that when it comes to constructing your house from scratch, you must understand the importance of incorporating high-quality materials for the durability, enhanced value, and optimal functionality of your house. Speaking of choosing high-quality materials, we recommend opting for energy-efficient materials that are also durable and appropriate for the property. It is important to mention here that you must be mindful of potential delays that can occur when constructing a house from scratch.

Roof Replacement Cost: What to Expect and How to Budget Accordingly
As a homeowner, the prospect of a roof replacement can be daunting, both physically and financially. The cost of a roof replacement can vary greatly depending on a number of factors, and it’s important to understand what to expect and how to budget accordingly. In this article, we’ll explore the key considerations when it comes to the cost of a roof replacement. Understanding the Factors that Affect Roof Replacement Cost The cost of a roof replacement is influenced by several factors, including the size of the roof, the type of roofing material, the complexity of the installation, and the location of the home. The size of the roof is a significant factor, as larger roofs require more materials and labor, which can drive up the overall cost. The type of roofing material is also a crucial consideration, as some materials, such as slate or metal, are more expensive than others, like asphalt shingles. The complexity of the installation can also impact the cost of a roof replacement. Roofs with complex designs, such as those with multiple levels or dormers, may require more specialized labor and additional materials, leading to a higher overall cost. Additionally, the location of the home can influence the cost, as labor and material prices can vary significantly between different regions. Estimating the Cost of a Roof Replacement When it comes to estimating the cost of a roof replacement, it’s important to consider all of the relevant factors. According to industry data, the average cost of a roof replacement in the United States ranges from $4,000 to $10,000, with the national average being around $7,000. However, it’s important to note that this is just a general estimate, and the actual cost can vary significantly based on the specific circumstances of the project. To get a more accurate estimate, it’s recommended to obtain quotes from multiple roofing contractors in your area. These contractors will be able to assess the unique needs of your home and provide a detailed cost breakdown, including the materials, labor, and any additional expenses, such as permit fees or disposal costs. Budgeting for a Roof Replacement When budgeting for a roof replacement, it’s important to consider not only the immediate costs but also the long-term implications. While a roof replacement can be a significant investment, it’s a crucial aspect of maintaining the overall health and value of your home. One way to budget for a roof replacement is to start saving for it well in advance. This can be done by setting aside a portion of your monthly budget specifically for roof maintenance and eventual replacement. Additionally, you may want to explore financing options, such as home equity loans or roof replacement-specific financing programs, which can help spread the cost over time. Conclusion Navigating the world of roof replacement costs can be a complex and daunting task, but with the right information and planning, you can ensure that your project is a success. By understanding the key factors that influence the cost, estimating the overall expenses, and budgeting accordingly, you can make an informed decision and protect the long-term value of your home.

Enhancing Your Smart Home with Advanced Switches
As smart home technology continues to evolve, so does the need for convenient and efficient control systems. In modern homes, traditional light switches are being replaced by advanced switches from Legrand that offer more functionality and seamless integration with home automation systems. Among these innovative solutions are the dp switch, smart home switches, and touch switches, which play a pivotal role in transforming your home into an intelligent living space. Understanding DP Switches A dp switch (double pole switch) is a reliable and essential component in smart homes, primarily used for controlling circuits that require isolating both live and neutral wires. Unlike regular switches that control only one wire, the dp switch ensures complete control over the electrical circuit, making it a safer and more secure option, particularly in environments with high-power appliances or lighting systems. These switches are typically used in scenarios where safety is paramount, such as in kitchens or garages, where heavy machinery or equipment might be involved. In a smart home setup, dp switches can be integrated with smart home systems, allowing you to control appliances or lighting remotely. Whether it’s for safety reasons or enhanced control, these switches offer a practical and reliable solution for modern homeowners. The Rise of Smart Home Switches Smart home switches have become an integral part of home automation systems. These switches allow you to control various devices in your home with ease, using your smartphone or voice commands through systems like Google Home or Alexa. Smart home switches can control everything from lights and fans to appliances, giving you the convenience of adjusting your home’s settings without having to be physically present. One of the major benefits of smart home switches is their ability to be programmed according to your needs. You can set timers, schedule on-and-off routines, or create custom scenes for different times of the day. For example, you can schedule your lights to turn on at sunset and turn off at bedtime, enhancing both convenience and energy efficiency. These switches also often feature integration with security systems, adding another layer of control for the modern, connected homeowner. Why Choose Touch Switches? The touch switch is another innovative addition to smart home setups. As the name suggests, these switches are operated by a simple touch, providing a sleek and modern aesthetic to your home’s interior. Not only do they offer a minimalist look, but touch switches are also highly functional, offering smooth operation and precision. These switches are often equipped with backlit LED indicators, making them easy to locate in the dark, further enhancing their usability. Additionally, touch switches are generally more durable than traditional mechanical switches due to their lack of moving parts, reducing wear and tear over time. Conclusion Whether you’re looking to upgrade your home’s electrical systems with a dp switch for added safety, smart home switches for convenience, or touch switches for a modern aesthetic, the right choice can significantly enhance your home automation experience. For reliable, high-quality solutions, brands like Legrand offer a wide range of options that cater to various needs, ensuring you can enjoy a smarter, safer, and more stylish home environment.

Why Rubber Roofing Is the Best Choice for Your NJ Property
When it comes to protecting your New Jersey property, choosing the right roofing material is crucial. The roof is not just a structural element but the first line of defense against harsh weather conditions, leaks, and other external factors that can affect your home or business. Among the various roofing materials available, rubber roofing has emerged as one of the top choices, especially for properties in New Jersey. Whether you own a residential or commercial building, rubber roofing offers a combination of durability, flexibility, and environmental benefits that make it an ideal choice. In this article, we’ll explore why rubber roofing is the best option for your NJ property. What is Rubber Roofing? Rubber roofing, commonly known as EPDM (Ethylene Propylene Diene Monomer), is a synthetic rubber membrane designed to withstand extreme weather conditions. EPDM roofing is typically installed on flat or low-sloped roofs, making it a popular choice for both commercial buildings and residential properties. The membrane comes in large rolls and is applied in sheets, which means fewer seams and a reduced risk of leaks. The material is available in two main colors: black and white. While black EPDM roofing absorbs heat, white EPDM is reflective and can help keep your property cooler during the summer months. Regardless of the color you choose, EPDM rubber roofing provides exceptional protection and numerous advantages for property owners in New Jersey. Advantages of Rubber Roofing for New Jersey Properties 1. Durability and Longevity New Jersey’s weather can be unpredictable, with everything from heavy snowfall to torrential rains and strong winds. Rubber roofing is built to last and can withstand these extreme conditions. EPDM roofing is highly resistant to cracking, tearing, and punctures, providing a durable barrier against the elements. Rubber roofing can last up to 50 years with proper maintenance, far outlasting many other roofing materials like asphalt shingles, which typically last between 15 and 30 years. This makes it a cost-effective solution for property owners looking for long-term protection. 2. Energy Efficiency One of the most significant benefits of rubber roofing is its energy efficiency. As mentioned earlier, EPDM comes in black and white colors. White EPDM is particularly beneficial for energy savings because it reflects sunlight and helps to keep your property cooler in the summer. This reduces the need for air conditioning and can lead to lower energy bills over time. Even black EPDM roofing, while it absorbs heat, provides excellent insulation during colder months, which helps keep heating costs down. This balance makes rubber roofing an energy-efficient option year-round. 3. Low Maintenance Rubber roofing is known for its low maintenance requirements. Unlike other roofing materials that may require frequent repairs or replacements, rubber roofing remains in good condition with minimal upkeep. The material is resistant to algae, moss, and mold growth, which means it doesn’t suffer from the same wear and tear that can affect other roof types. In the rare event that your rubber roof does develop a tear or puncture, repairs are relatively easy. A simple patch can fix the issue, and professional roofing specialists can complete the repair quickly without the need for a full roof replacement. 4. Weather Resistance New Jersey experiences all four seasons, from hot and humid summers to freezing winters. Rubber roofing is designed to handle these diverse conditions. EPDM rubber is resistant to extreme temperatures, UV rays, and ozone exposure, ensuring that your roof stays intact no matter the weather. In the event of heavy rains or snowstorms, EPDM’s seamless installation reduces the risk of leaks. It also expands and contracts with temperature changes, preventing cracks and gaps from forming over time. 5. Eco-Friendly Option For property owners who are environmentally conscious, rubber roofing is an eco-friendly choice. EPDM roofing is made from recycled materials and is fully recyclable at the end of its life cycle. Its energy efficiency also reduces the overall carbon footprint of your property. In addition to its recyclability, rubber roofing minimizes waste during installation due to the large sheets used. This reduces the number of seams and excess material, making the installation process more efficient and less wasteful compared to other roofing options. 6. Cost-Effective Installation While the initial cost of rubber roofing may be higher than traditional asphalt shingles, it offers significant savings in the long run. Its durability, energy efficiency, and low maintenance needs make it a cost-effective solution for New Jersey property owners. With fewer repairs and a longer lifespan, you can avoid the frequent expenses associated with replacing or repairing other roofing materials. Moreover, the installation process for rubber roofing is relatively simple. The large sheets reduce installation time, and because it requires fewer seams, the risk of leaks is minimized, cutting down on future repair costs. Why Choose Rubber Roofing Specialists in NJ? While rubber roofing has numerous benefits, it’s essential to work with experienced rubber roofing specialists NJ. Professional installation is key to ensuring that your roof performs optimally and lasts as long as possible. Specialists who are familiar with the unique weather conditions and building codes in NJ will ensure that your rubber roofing is installed correctly and meets local regulations. Additionally, professional rubber roofing contractors will be able to provide maintenance services that can extend the life of your roof. Regular inspections and prompt repairs will keep your roof in top condition and protect your property from potential damage. The industries served include commercial buildings, industrial facilities, warehouses, and retail spaces, where reliable roofing solutions are essential for long-term protection and performance. Conclusion Rubber roofing is an excellent choice for New Jersey property owners looking for a durable, energy-efficient, and eco-friendly roofing solution. Its ability to withstand extreme weather conditions, low maintenance requirements, and long lifespan make it a superior option for both residential and commercial properties. By working with a trusted rubber roofing specialist, you can ensure that your property is protected for decades to come. Investing in rubber roofing is a smart decision that will pay off in reduced energy costs, fewer repairs,

How to Make Your Home Look Luxurious on a Budget?
Do you ever desire that your home look more elegant? You don’t have to break the bank to make your home luxurious and stylish. With some thoughtful design selections and a bit of imagination, you can transform any area into a sophisticated and well-curated home. Why do you want to add an expensive touch to a house? It is vital because living in a well-curated home can enhance its value, especially if you plan to sell it soon. Whether you are looking for luxury home ideas, these professional tips will help you achieve an expensive aesthetic in every home space. Test Your Garage Door Monthly Garage Door System Maintenance is essential to owning a luxurious home, as it helps your garage function correctly. Finally, testing your garage door is among the most crucial things you can do to keep it in good working condition. This involves testing the automatic opener and the manual function and examining the balance. To test the automatic opener, you can press the button to open and close the door multiple times. Observe how smoothly it works and listen for any odd sounds or problems. To ensure smooth operation, disconnect the automatic opener and manually lift and lower the door to avoid getting stuck. To test the balance, detach the automatic opener and attempt lifting the garage door halfway. It should remain in position without help. If something doesn’t work correctly and you need help fixing it safely, contact an expert. Adding Decorative Touches to Your Door Customize your entry door with unique decorative features that express your style and complement the surrounding area. Here are some current suggestions to get you started: Glass entry doors are trendy. Consider adding window inserts or glass panels to increase natural light and visual interest in your door. Select from pure, frosted, or stained glass, and pick a pattern that complements your home’s architecture. Boost your custom metal entry doors with lavish moldings or trim to create a distinct appearance. Select prefabricated items or create molding designs using paintable foam or lightweight wood. Enhance your door’s aesthetics with a high-end faux finish, like a wood grain effect on steel or fiberglass doors. Add Stone or Other Natural Materials Adding stone accent pieces to your home can give it a luxurious appearance and touch. A simple way to achieve this is using a large stone slab as a coffee table or fireplace mantel. You can also utilize smaller stones to make pathways in your garden. This may keep your home looking tidy to add visual interest. If you want to make your home look expensive, adding stone elements is a terrific method to do it. Stone, a centuries-old natural material, remains popular in architecture and interior design due to its historical use and appeal. You may be certain that your investment will last because it is also long-lasting and durable. Choose Well-Designed Light Fixtures A dramatic chandelier is the focal point of any room. A bold pendant light increases the room’s height, creating a spacious and brighter atmosphere. It’s a piece that instantly adds elegance and gives the room a more opulent vibe. Wall sconces or elegant floor lamps are also excellent additions to make a room feel more luxurious. If your room already has these, consider upgrading them for a fresh appearance and feel. Concentrate on layering all your lighting components for a well-designed space to satisfy your lighting requirements throughout the day.

DIY Window Treatments: Elevating Privacy and Style with Creative Solutions
Understanding the Importance of Window Treatments Windows play a crucial role in defining the ambiance and functionality of a room, but without the right treatments, they can feel incomplete. Window treatments not only enhance privacy and control light exposure but also add personality and style to your living space. By understanding the importance of window treatments, you can transform your windows into focal points while elevating the overall aesthetic of your home. Privacy and Light Control: One of the primary functions of window treatments is to provide privacy and control over natural light. Depending on your needs and preferences, you can choose treatments that range from sheer fabrics for soft diffusion of light to opaque materials for complete privacy and light blocking. Consider the orientation of your windows and the desired level of privacy for each room when selecting treatments. Temperature Regulation: Window treatments also play a role in regulating temperature and energy efficiency within your home. Insulating treatments such as curtains or blinds can help minimize heat gain in the summer and heat loss in the winter, reducing energy consumption and utility costs. Look for treatments with thermal lining or adjustable features to maximize comfort and energy savings year-round. Aesthetic Enhancement: Beyond their practical benefits, window treatments serve as decorative accents that enhance the style and ambiance of a room. From elegant draperies to sleek blinds, the choice of treatments can significantly impact the overall aesthetic of your space. Consider the architectural style of your home, as well as your personal design preferences, when selecting treatments that complement your interior decor. Sound Absorption: In addition to controlling light and temperature, certain window treatments can also help dampen outside noise, creating a quieter and more peaceful indoor environment. Thick, textured fabrics and layered treatments such as curtains paired with blinds or shades can effectively absorb sound and reduce unwanted noise pollution from entering your home. Crafting Your Own Stylish and Functional Treatments DIY Curtain Panels: Create custom curtain panels that reflect your personal style and fit your windows perfectly with DIY sewing projects. Choose fabrics that complement your decor and add visual interest, such as bold patterns, textured weaves, or luxurious textures. Measure your windows carefully and follow online tutorials or sewing patterns to craft tailored curtain panels that add charm and elegance to your space. No-Sew Roman Shades: For a simple and budget-friendly window treatment option, consider making no-sew Roman shades using fabric and basic crafting supplies. Cut fabric to size and attach adhesive-backed hook-and-loop tape to create folds, then mount the shades inside the window frame using tension rods or mounting hardware. Customize the look with decorative trims or embellishments for added style. Upcycled Blinds: Give old or outdated blinds a fresh new look with a coat of paint or fabric covering. Remove blinds from the window and clean them thoroughly before applying primer and paint in your desired color scheme. Alternatively, use fabric glue or double-sided tape to adhere fabric to the slats, creating a custom fabric-covered look. Experiment with patterns, textures, and colors to match your decor style. DIY Window Film: Add privacy and style to your windows with DIY window film projects using adhesive vinyl or contact paper. Cut the film to fit your window dimensions and apply it directly to the glass surface, smoothing out any air bubbles or wrinkles with a squeegee. Choose from a variety of patterns, designs, and opacity levels to create a custom look that enhances privacy while allowing natural light to filter through. Handmade Valances: Craft handmade valances to add a touch of charm and personality to your windows. Experiment with different fabric styles, such as ruffled, pleated, or scalloped, to create custom valances that complement your decor theme. Hang valances using tension rods or decorative hardware for easy installation and versatile styling options. Repurposed Textiles: Explore creative ways to repurpose textiles such as scarves, tablecloths, or vintage linens into unique window treatments. Use curtain clips or clip rings to hang lightweight textiles directly from curtain rods for a bohemian-inspired look. Mix and match patterns and textures for an eclectic and personalized aesthetic that adds character to your space. With a bit of creativity and DIY spirit, you can craft stylish and functional window treatments that enhance privacy, control light exposure, and elevate the aesthetic appeal of your home. Whether you prefer custom curtain panels, no-sew Roman shades, or repurposed textiles, there are endless possibilities for creating unique and personalized treatments that reflect your individual style and taste.

Lighting Your Home: Tips for Ambiance and Efficiency
Lighting plays a crucial role in creating ambiance, enhancing functionality, and improving energy efficiency in your home. Thoughtful lighting design can transform spaces, evoke moods, and optimize visual comfort. In this guide, we’ll explore tips for lighting your home effectively to achieve the perfect balance of ambiance and efficiency. Subtitles: Understanding Lighting Design Principles Tips for Ambiance and Energy-Efficient Lighting Understanding Lighting Design Principles 1. Layered Lighting A well-designed lighting scheme incorporates multiple layers of light to create depth, functionality, and ambiance. These layers typically include ambient lighting, task lighting, and accent lighting, each serving a specific purpose. Tips: Ambient Lighting: Provide overall illumination with ambient lighting fixtures such as ceiling-mounted lights, chandeliers, or recessed lighting. This layer establishes the general brightness level of a room. Task Lighting: Install task lighting in areas where specific activities occur, such as reading lamps near seating areas, under-cabinet lighting in kitchens for food preparation, or desk lamps for workspaces. Task lighting ensures adequate light for focused tasks. Accent Lighting: Use accent lighting to highlight architectural features, artwork, or decorative elements. Wall sconces, track lighting, and picture lights are effective for accentuating focal points and creating visual interest. 2. Color Temperature Consider the color temperature of lighting sources to set the desired mood and ambiance. Color temperature is measured in Kelvin (K), with warmer tones (lower Kelvin) creating a cozy atmosphere, and cooler tones (higher Kelvin) providing a more vibrant and energizing feel. Tips: Warm White (2700K-3000K): Choose warm white lighting for areas where comfort and relaxation are desired, such as bedrooms, living rooms, and dining areas. Warm tones create a cozy and inviting ambiance. Cool White (3500K-4100K): Opt for cool white lighting in task-oriented spaces like kitchens, bathrooms, and home offices. Cool tones enhance visibility and focus for activities requiring concentration. Daylight White (5000K-6500K): Use daylight white lighting for areas that benefit from natural daylight simulation, such as reading nooks, workshops, or art studios. Daylight tones promote alertness and productivity. 3. Lighting Control Implement lighting control systems to customize brightness levels, create lighting scenes, and maximize energy efficiency. Dimmers, timers, sensors, and smart lighting technologies allow you to adjust lighting according to specific needs and preferences. Tips: Dimmer Switches: Install dimmer switches for adjustable brightness levels in various rooms. Dimming lights not only enhances ambiance but also reduces energy consumption. Smart Lighting: Use smart lighting systems that integrate with mobile apps or voice assistants for convenient control. Schedule lighting scenes, adjust color temperatures, and monitor energy usage remotely. Motion Sensors: Incorporate motion sensors in areas like hallways, closets, or outdoor spaces to activate lights only when needed. This reduces unnecessary energy usage and enhances safety. Tips for Ambiance and Energy-Efficient Lighting 1. Use LED Lighting Opt for energy-efficient LED (Light Emitting Diode) lighting throughout your home. LED lights consume less energy, last longer, and offer a range of color temperatures and designs to suit different lighting needs. Tips: LED Bulbs: Replace traditional incandescent or CFL bulbs with LED bulbs for significant energy savings. LED bulbs are available in various shapes, sizes, and wattages to fit existing fixtures. LED Fixtures: Choose LED fixtures for ambient, task, and accent lighting applications. LED technology provides bright, uniform illumination while reducing electricity costs and maintenance requirements. 2. Maximize Natural Light Utilize natural light to supplement artificial lighting and reduce reliance on electricity during daylight hours. Design spaces with ample windows, skylights, and light wells to maximize natural daylighting. Tips: Window Treatments: Use sheer or light-filtering window treatments to allow natural light to penetrate while maintaining privacy and glare control. Avoid heavy curtains that block sunlight completely. Reflective Surfaces: Position mirrors, light-colored walls, and glossy finishes strategically to reflect natural light and distribute it throughout the room. This enhances brightness and reduces the need for artificial lighting. Solar Tubes: Consider installing solar tubes or light tunnels in areas with limited access to natural light, such as interior rooms or corridors. These tubes capture sunlight and channel it into interior spaces, reducing reliance on electric lighting. 3. Task-Oriented Lighting Placement Place task lighting fixtures strategically to minimize glare, shadows, and visual discomfort. Position task lights at appropriate heights and angles to optimize visibility and comfort for specific activities. Tips: Desk Lighting: Position desk lamps or overhead task lights to illuminate work surfaces evenly without causing glare or shadows. Choose adjustable lamps with flexible arms for precise positioning. Kitchen Lighting: Install under-cabinet lighting for countertop tasks like food preparation and cooking. Ensure uniform illumination without casting shadows or interfering with tasks. Reading Nooks: Place reading lamps or floor lamps near seating areas to provide focused light for reading, hobbies, or relaxation. Direct light onto reading materials at a comfortable angle to prevent eye strain. 4. Energy-Efficient Fixtures and Controls Select energy-efficient lighting fixtures and controls to minimize electricity consumption and environmental impact. Look for ENERGY STAR-certified products, efficient bulb types, and advanced control options. Tips: ENERGY STAR Fixtures: Choose lighting fixtures with the ENERGY STAR label, indicating high efficiency and performance standards. ENERGY STAR-rated products consume less energy and may qualify for utility rebates. Low-Energy Bulbs: Use low-energy bulb types such as LEDs, CFLs (Compact Fluorescent Lamps), or halogen incandescents. These bulbs offer energy savings, long lifespan, and compatibility with dimmers. Occupancy Sensors: Install occupancy sensors or timers in rooms with intermittent use, such as bathrooms, closets, or utility spaces. These sensors automatically turn off lights when no activity is detected, reducing energy waste. By applying these lighting design tips for ambiance and energy efficiency, you can create inviting, well-lit spaces that enhance comfort, productivity, and sustainability in your home. Whether you’re illuminating living areas, task-oriented zones, or outdoor environments, thoughtful lighting choices contribute to a harmonious and eco-friendly living experience. Experiment with different lighting techniques, explore energy-efficient technologies, and tailor lighting solutions to suit your lifestyle and aesthetic preferences for a beautifully lit home environment.
